
nvme_reset_work() 함수 분석
nvme_reset_work() 함수 분석
nvme_probe() 함수의 마지막 단계에서 nvme_reset_work() 함수를 호출하여 reset 작업을 수행합니다. 먼저 nvme_reset_work() 함수의 코드를 살펴봅니다.
static void nvme_reset_work(struct work_struct *work)
{
	struct nvme_dev *dev = container_of(work, struct nvme_dev, reset_work);

	int result = -ENODEV;

	// nvme_reset_work() 함수가 다시 호출되지 않도록 NVME_CTRL_RESETTING 플래그를 확인합니다.
	if (WARN_ON(dev->ctrl.state == NVME_CTRL_RESETTING))
		goto out;

	// If we're called to reset a live controller first shut it down before moving on.
	if (dev->ctrl.ctrl_config & NVME_CC_ENABLE)
		nvme_dev_disable(dev, false);

	if (!nvme_change_ctrl_state(&dev->ctrl, NVME_CTRL_RESETTING))
		goto out;

	result = nvme_pci_enable(dev);
	if (result)
		goto out;

	result = nvme_configure_admin_queue(dev);
	if (result)
		goto out;

	nvme_init_queue(dev->queues[0], 0);
	result = nvme_alloc_admin_tags(dev);
	if (result)
		goto out;

	result = nvme_init_identify(&dev->ctrl);
	if (result)
		goto out;

	result = nvme_setup_io_queues(dev);
	if (result)
		goto out;

	if (dev->online_queues > 1)
		nvme_queue_async_events(&dev->ctrl);

	mod_timer(&dev->watchdog_timer, round_jiffies(jiffies + HZ));
	// Keep the controller around but remove all namespaces if we don't have any working I/O queue.
	if (dev->online_queues < 2) {
		dev_warn(dev->ctrl.device, "IO queues not created\n");
		nvme_kill_queues(&dev->ctrl);
		nvme_remove_namespaces(&dev->ctrl);
	} else {
		nvme_start_queues(&dev->ctrl);
		nvme_dev_add(dev);
	}

	if (!nvme_change_ctrl_state(&dev->ctrl, NVME_CTRL_LIVE)) {
		dev_warn(dev->ctrl.device, "failed to mark controller live\n");
		goto out;
	}

	if (dev->online_queues > 1)
		nvme_queue_scan(&dev->ctrl);

    return;

 out:
	nvme_remove_dead_ctrl(dev, result);
}
nvme_reset_work() 함수의 주요 작업은 다음과 같이 요약할 수 있습니다.
ⓐ nvme_reset_work() 함수를 입력한 후, NVME_CTRL_RESETTING 플래그를 먼저 확인하여 nvme_reset_work() 함수가 반복적으로 호출되지 않도록 합니다.
ⓑ nvme_pci_enable() 함수 호출
ⓒ nvme_configure_admin_queue() 함수 호출
ⓓ nvme_init_queue() 함수 호출
ⓔ nvme_alloc_admin_tags() 함수 호출
ⓕ nvme_init_identify() 함수 호출
ⓖ nvme_setup_io_queues() 함수 호출
ⓗ nvme_start_queues() / nvme_dev_add() 함수 호출 후 nvme_queue_scan() 함수 호출
ⓑ nvme_pci_enable() 함수
이제 각 단계별로 호출되는 함수를 분석해 봅니다. 먼저 nvme_pci_enable() 함수의 내용을 살펴보십시오.
static int nvme_pci_enable(struct nvme_dev *dev)
{
u64 cap;
int result = -ENOMEM;
struct pci_dev *pdev = to_pci_dev(dev->dev);
// 이전에 매핑된 BAR 영역인 nvme 장치의 메모리 공간 iomem을 활성화합니다.
if (pci_enable_device_mem(pdev))
return result;
// 디바이스가 버스를 얻을 수 있도록 설정합니다.
// 즉, 장치가 PCI 버스를 얻을 수 있도록 함수를 호출합니다.
pci_set_master(pdev);
// 이 nvme 장치의 DMA 영역 크기를 64비트 또는 32비트로 설정합니다.
if (dma_set_mask_and_coherent(dev->dev, DMA_BIT_MASK(64)) &&
dma_set_mask_and_coherent(dev->dev, DMA_BIT_MASK(32)))
goto disable;
// 컨트롤러 레지스터 NVME_REG_CSTS를 읽어 컨트롤러의 상태를 확인합니다.
if (readl(dev->bar + NVME_REG_CSTS) == -1) {
result = -ENODEV;
goto disable;
}
// INITx/MSI/MSI-X 장치에 인터럽트 요청 할당
result = pci_alloc_irq_vectors(pdev, 1, 1, PCI_IRQ_ALL_TYPES);
if (result < 0)
return result;
// 장치의 64비트 컨트롤러 기능(CAP) 가져오기
cap = lo_hi_readq(dev->bar + NVME_REG_CAP);
dev->q_depth = min_t(int, NVME_CAP_MQES(cap) + 1, NVME_Q_DEPTH);
dev->db_stride = 1 << NVME_CAP_STRIDE(cap);
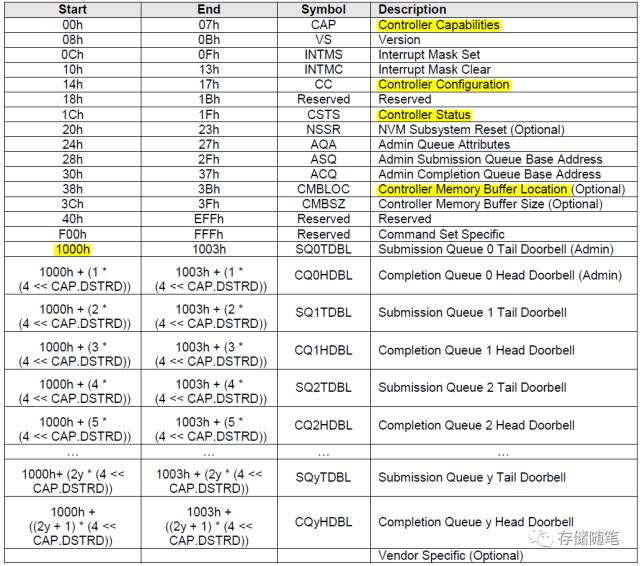
// 아래 그림의 컨트롤러 레지스터 정의 테이블에서 SQ0 Tail Doorbell의 시작 주소를 0x1000(=4096) 설정
dev->dbs = dev->bar + 4096;
// 다음 단락은 여기서 무시되는 Apple 버그입니다.
if (pdev->vendor == PCI_VENDOR_ID_APPLE && pdev->device == 0x2001) {
dev->q_depth = 2;
dev_warn(dev->dev, "detected Apple NVMe controller, set "
"queue depth=%u to work around controller resets\n",
dev->q_depth);
}
// nvme 프로토콜의 버전이 1.2 이상인 경우 nvme_map_cmb를 호출해야 합니다.
// 컨트롤러 메모리 버퍼 매핑 CMB의 주요 기능은 SQ/CQ의 위치를 저장하는 것입니다.
if (readl(dev->bar + NVME_REG_VS) >= NVME_VS(1, 2, 0)) {
dev->cmb = nvme_map_cmb(dev);
if (dev->cmbsz) {
if (sysfs_add_file_to_group(&dev->ctrl.device->kobj,
&dev_attr_cmb.attr, NULL))
dev_warn(dev->dev,
"failed to add sysfs attribute for CMB\n");
}
}
pci_enable_pcie_error_reporting(pdev); // 오류 처리
pci_save_state(pdev); // Suspend 전에 장치의 현재 상태를 저장합니다.
return 0;
disable:
pci_disable_device(pdev);
return result;
}
위의 코드에서 우리는 nvme_pci_enable() 함수가 실행 중에 많은 NVMe 컨트롤러 레지스터를 접근한다는 것을 알수 있습니다(아래 표 참조).
pci_alloc_irq_vectors_affinity() 함수
nvme_pci_enable() 함수에서 수행되는 또 다른 중요한 작업은 장치에 인터럽트를 할당하는 것입니다. nvme 장치는 세 가지 인터럽트 모드를 지원합니다. INITx/MSI/MSI-X 이 세 가지 인터럽트 모드의 구체적인 차이점은 NVMe 이야기 #4: Interrupts 메커니즘을 참조하세요. 인터럽트 모드를 할당하는 pci_alloc_irq_vectors() 함수는 실제로 pci_alloc_irq_vectors_affinity() 함수를 호출합니다.
int pci_alloc_irq_vectors_affinity(struct pci_dev *dev, unsigned int min_vecs,
				   unsigned int max_vecs, unsigned int flags,
				   const struct irq_affinity *affd)
{
	static const struct irq_affinity msi_default_affd;
	int vecs = -ENOSPC;

	// Affinity에 대해 IRQ가 자동으로 할당되면 IRQ 인터럽트가 모든 CPU에 할당됩니다.
	// nvme_pci_enable() 함수에서 호출되면, *affd=NULL
	if (flags & PCI_IRQ_AFFINITY) {
		if (!affd)
			affd = &msi_default_affd;
        	if (affd->pre_vectors + affd->post_vectors > min_vecs)
				return -EINVAL;
		if (affd->pre_vectors + affd->post_vectors == min_vecs)
				affd = NULL;
	} else {
		if (WARN_ON(affd))
			affd = NULL;
	}

	// MSI-X 인터럽트 할당, MSI-X 기능 구조 구성
	if (flags & PCI_IRQ_MSIX) {
		vecs = __pci_enable_msix_range(dev, NULL, min_vecs, max_vecs,
				affd);
		if (vecs > 0)
			return vecs;
	}

	// MSI 인터럽트 할당, MSI 기능 구조 구성
	if (flags & PCI_IRQ_MSI) {
		vecs = __pci_enable_msi_range(dev, min_vecs, max_vecs, affd);
		if (vecs > 0)
			return vecs;
	}

	// INITx 인터럽트 할당
	if ((flags & PCI_IRQ_LEGACY) && min_vecs == 1) {
		pci_intx(dev, 1);
		return 1;
	}

	return vecs;
}
이 세 가지 인터럽트를 동시에 활성화할 수 없다는 점에 유의해야 합니다. 예를 들어 MSI-X 인터럽트를 사용하려면 INITx 및 MSI 인터럽트를 비활성화해야 합니다.
지금까지 nvme_pci_enable() 함수에 대해 대략적으로 분석해 보았고, nvme_configure_admin_queue() 함수에 대해서는 다음 글에서 다음에 분석 하겠습니다.