
Appium기반 Windows Application 테스트 자동화 #2
계산기 테스트 자동화
0. 시작에 앞서
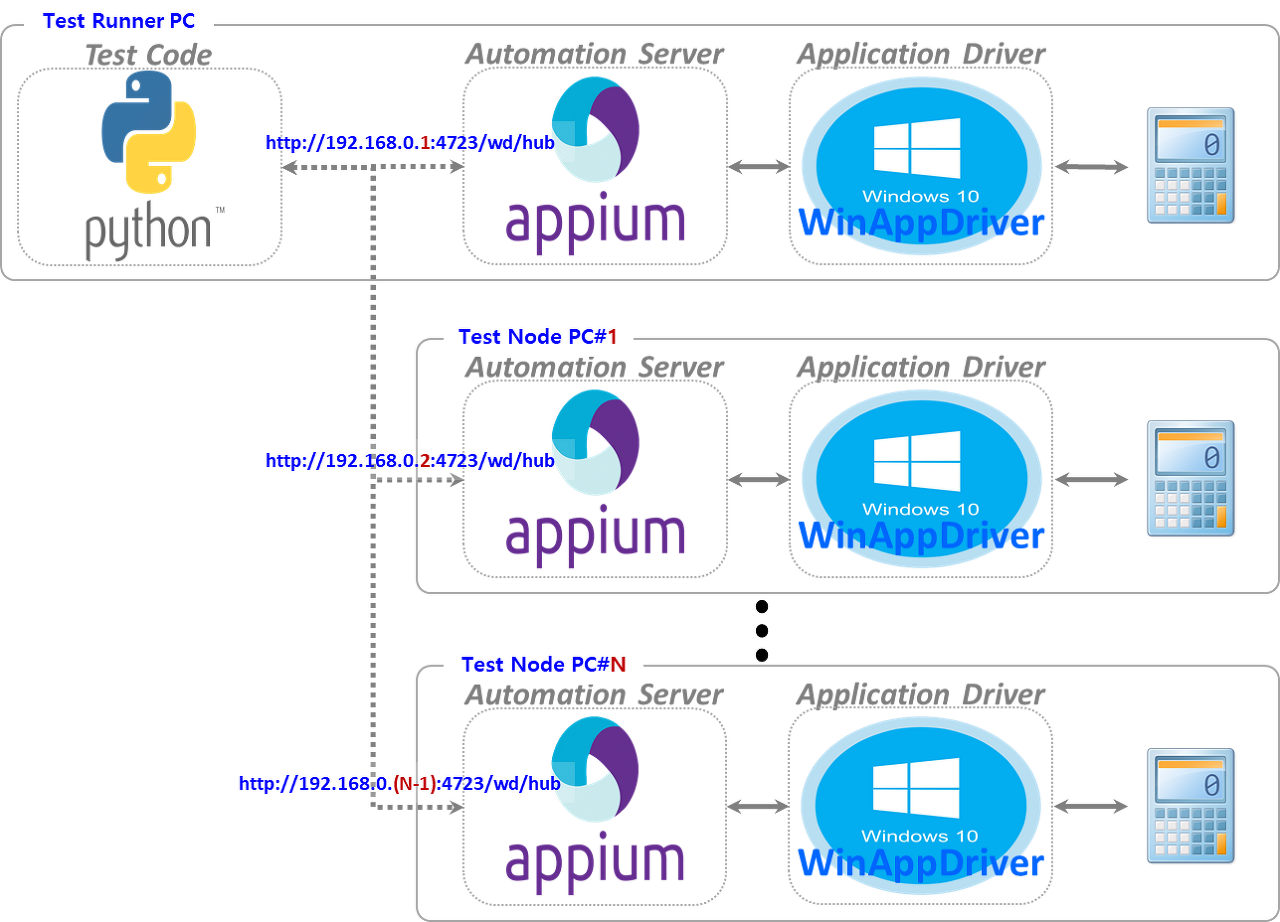
여기에서는 아래 계산기 테스트 자동화 Flow와 같이 Test Runner상에서 수행되는 Python Test Code를 이용해 Test Runner PC 및 Test Node PC에 있는 계산기 Application 테스트 자동화를 진행해 보겠습니다.
여기서 테스트란? 각 PC 상에서 있는 계산기를 실행하고, 실행된 계산기 Application UI 요소인 숫자/연산자 버튼을 클릭하고, 최종 연산의 결과가 출력되는 Application UI 요소인 결과창의 값을 읽어 기대값과 비교하여 Pass/Fail을 판단하는 것을 의미합니다.
즉, 앞으로 방금 기술한 문장을 코드로 구현하겠지요……
1. Python Test Code Sample - CalculatorTest
Base 코드는 WAD 사이트의 계산기 테스트 자동화(CalculatorTest) Python Sample 입니다.
진행하면 수정된 코드는 저의 GitHub를 참고하시기 바랍니다.
WAD 사이트에서 계산기 테스트를 아래와 같이 기술하고 있습니다. 원모양 블릿 부분을 보시면 위에서 기술한 내용을 Code 레벨로 기술하고 있습니다.
CalculatorTest is a sample test project that runs and validates basic UI scenarios on Windows 10 built-in Calculator application. This sample is created as the most basic test project to quickly try out Windows Application Driver. This test project highlights the following basic interactions to demonstrate how you can write UI tests in Python which run with Windows Application Driver.
○ Creating a modern UWP app session
○ Finding element using name
○ Finding element using accessibility id
○ Sending click action to an element
○ Retrieving element value
import unittest
from appium import webdriver

class SimpleCalculatorTests(unittest.TestCase):

    @classmethod

    def setUpClass(self):
        #set up appium
        desired_caps = {}
        desired_caps["app"] = "Microsoft.WindowsCalculator_8wekyb3d8bbwe!App"
        self.driver = webdriver.Remote(
            command_executor='http://127.0.0.1:4723',
            desired_capabilities= desired_caps)

    @classmethod
    def tearDownClass(self):
        self.driver.quit()

    def getresults(self):
        displaytext = self.driver.find_element_by_accessibility_id("CalculatorResults").text
        displaytext = displaytext.strip("Display is " )
        displaytext = displaytext.rstrip(' ')
        displaytext = displaytext.lstrip(' ')
        return displaytext


    def test_initialize(self):
        self.driver.find_element_by_name("Clear").click()
        self.driver.find_element_by_name("Seven").click()
        self.assertEqual(self.getresults(),"7")
        self.driver.find_element_by_name("Clear").click()

    def test_addition(self):
        self.driver.find_element_by_name("One").click()
        self.driver.find_element_by_name("Plus").click()
        self.driver.find_element_by_name("Seven").click()
        self.driver.find_element_by_name("Equals").click()
        self.assertEqual(self.getresults(),"8")

    def test_combination(self):
        self.driver.find_element_by_name("Seven").click()
        self.driver.find_element_by_name("Multiply by").click()
        self.driver.find_element_by_name("Nine").click()
        self.driver.find_element_by_name("Plus").click()
        self.driver.find_element_by_name("One").click()
        self.driver.find_element_by_name("Equals").click()
        self.driver.find_element_by_name("Divide by").click()
        self.driver.find_element_by_name("Eight").click()
        self.driver.find_element_by_name("Equals").click()
        self.assertEqual(self.getresults(),"8")

    def test_division(self):
        self.driver.find_element_by_name("Eight").click()
        self.driver.find_element_by_name("Eight").click()
        self.driver.find_element_by_name("Divide by").click()
        self.driver.find_element_by_name("One").click()
        self.driver.find_element_by_name("One").click()
        self.driver.find_element_by_name("Equals").click()
        self.assertEqual(self.getresults(),"8")

    def test_multiplication(self):
        self.driver.find_element_by_name("Nine").click()
        self.driver.find_element_by_name("Multiply by").click()
        self.driver.find_element_by_name("Nine").click()
        self.driver.find_element_by_name("Equals").click()
        self.assertEqual(self.getresults(),"81")

    def test_subtraction(self):
        self.driver.find_element_by_name("Nine").click()
        self.driver.find_element_by_name("Minus").click()
        self.driver.find_element_by_name("One").click()
        self.driver.find_element_by_name("Equals").click()
        self.assertEqual(self.getresults(),"8")

if __name__ == '__main__':
    suite = unittest.TestLoader().loadTestsFromTestCase(SimpleCalculatorTests)
    unittest.TextTestRunner(verbosity=2).run(suite)
Requirements
간단히 Base 코드 실행을 위해서는 아래와 같은 요구사항이 충족되어야 합니다.
- Windows 10 PC with the latest Windows 10 version (Version 1607 or later)
- Python v2.7 or higher
- Use Python package manager (PIP) to install the following dependencies
- Appium-Python-Client (tested version 0.24)
- selenium (tested version 3.5.0)
- setuptools (tested version 28.8.0)
Python으로 쓰여진 Test Code가 Appium에게 HTTP Message를 보내기 위해서는 Python 패키지 중 Appium-Python-Client와 selenium이 필요합니다. 앞선 환경 구축 게시물에서 Python 개발 환경인 Anaconda 설치한 상태에서 아래 명령으로 Appium-Python-Client를 설치하면 최신 버전의 Appium-Python-Client 패키지가 먼저 설치되고 pip가 dependencies를 체크해 적절한 버전의 selenium도 설치합니다.
게시물 작성 기준으로 아래 명령으로 설치되는 Appium-Python-Client 패키지는 2.1.2이고 selenium 패키지는 4.1.0입니다.
pip Appium-Python-Client
여기까지 마쳤으면, 이제 Base 코드 실행 준비가 되었습니다.
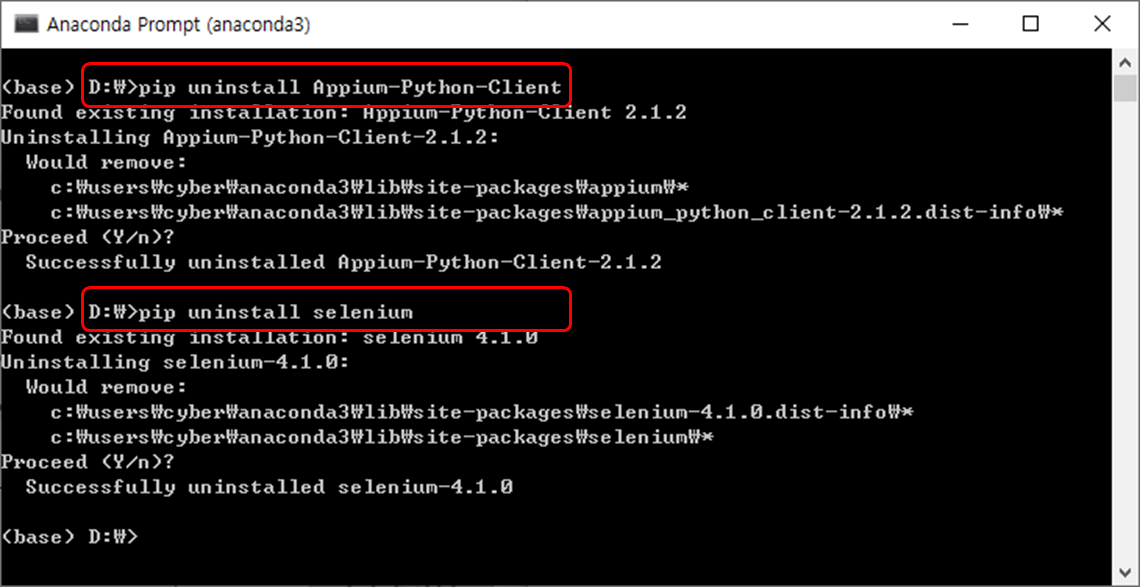
※ 참고로 이전 환경 구축 게시물에서 npm을 이용한 Appium 설치를 권장했었습니다. 혹시 Appium Server in Desktop GUIs for Mac, Windows, and Linux 설치 파일을 이용하신 경우, selenium 4.0 이상에서 WinAppDriver사이에 호환성 문제가(Link: https://github.com/microsoft/WinAppDriver/issues/1638) 있어 문제가 없는 version으로 설치가 필요합니다. 아래의 pip uninstall 명령으로 설치된 version을 제거합니다.
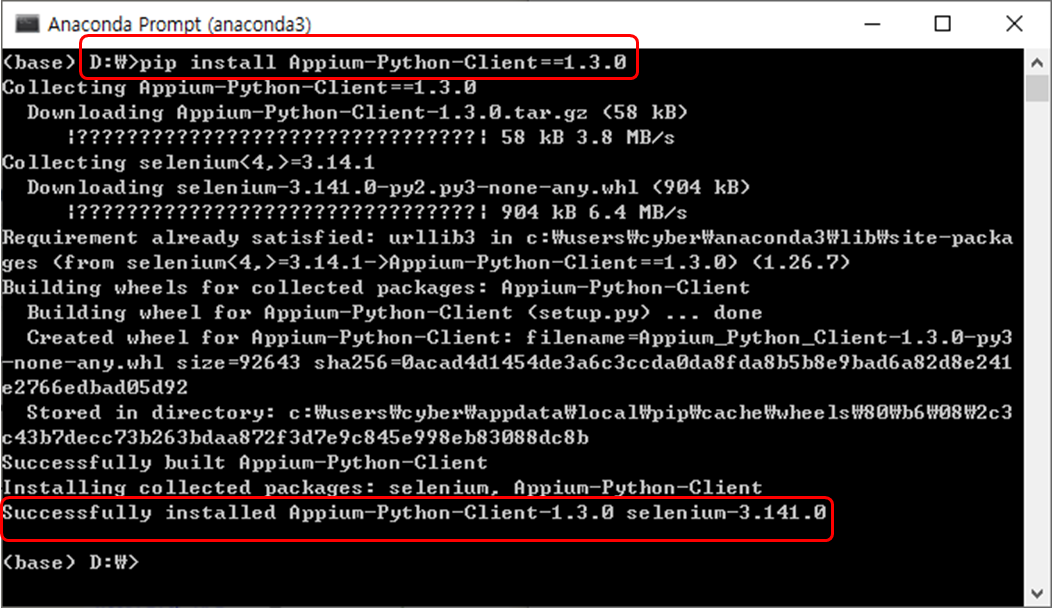
다시 Appium-Python-Client 설치시 version을 명기해 새로 설치합니다. version은 {패키지명==x.x.x} 형태로 명기합니다. 실험에 의하면 Appium-Python-Client==1.3.0과 selenium==3.141.0에서는 호환성 문제가 없습니다.
2. 테스트 자동화 Case#1: {Python Test Code→Appium→WinAppDriver(WAD)→Calculator@Local PC}
다음은 Test Runner PC상에서 Appium을 실행시키고, Python Test Code를 이용해 Test Runner PC상의 계산기 Appication 테스트를 진행해 보겠습니다. 즉, 계산기 테스트 자동화 Flow에서 첫 줄에 해당됩니다. 눈치 체셨겠지만, 제목의 파란색 Text을 저렇게 쓴 이유가 계산기 테스트 자동화 Flow상에서 첫 출을 표현하고자 한 겁니다. 아래 3번 제목과 비교하시면 의도를 더 명확히 이해하실 수 있을 겁니다.
Appium 실행@Test Runner PC(Local PC)
Test Runner PC(Local PC)에서 Python Test Code, Appium, WinAppDriver(WAD) 그리고 Calculator Application 모두가 실행되게 하기 위해서 먼저 Appium을 실행합니다.
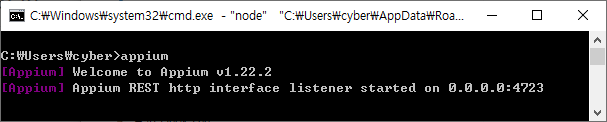
윈도우 시작-Node.js에서 Node.js command prompt 클릭하여 Command Line 창을 띄워 Appium을 실행합니다.
appium
아무런 옵션을 주지 않았기 때문에 아래와 같이 Default 설정으로(http://0.0.0.0:4723/wd/hub) Appium은 실행됩니다.
이상하지 않나요? 아래 실행화면상에는 http://0.0.0.0:4723으로 나오는데 뒤에 붙는 /wd/hub는 뭘까요? 질문에 답은 WAD WinAppDriver and Appium Wiki Page에서 The Appium default server path is different from WinAppDriver 부분을 참조하시면 됩니다. (Link: https://github.com/microsoft/WinAppDriver/wiki/WinAppDriver-and-Appium)
또 한가지 Appium은 0.0.0.0의 IP Address를 가지고 실행되었습니다. 이것의 의미는 많은 분들이 이미 설명해 두신 게시물들을 구글링해 보시기 바랍니다.
Differences in the flow of information 부분을 보시면, 이전 환경 구축-WinAppDriver 설치부분에서 언급한바와 같이 Local PC에서는 Appium 없이도 WAD를 이용해 Windows Application 테스트가 가능한 힌트(?)가 있습니다. Appium은 Test Code의 Command를 받아 WinAppDriver로 전달하는 Wrapper 역할을 하는 RESTful Server입니다. Local PC의 경우 WinAppDriver가 Test Code로 부터 Command를 바로 수신하는 Appium 역할을 수행하게 되는 겁니다. 이렇게요…..{Python Test Code→Appium→WinAppDriver(WAD)→Calculator@Local PC}
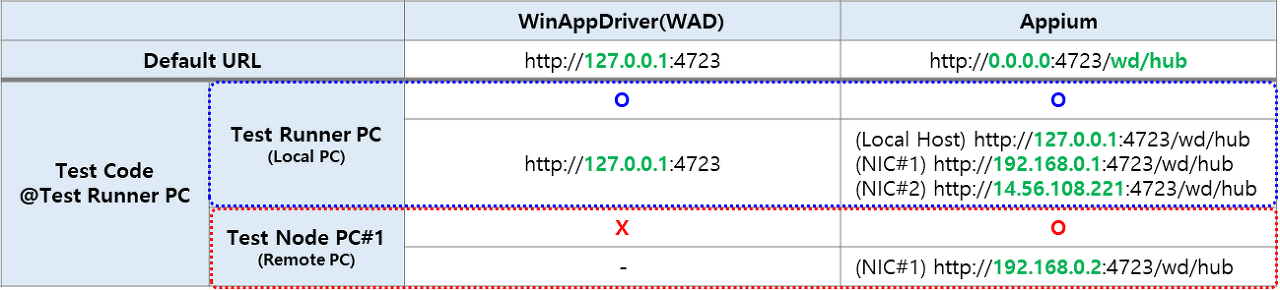
자! 환경 구축부터 여기까지 정독하셨다면, 계산기 테스트 자동화 Flow 구성도를 참고하여 아래 테이블을 보시기 바랍니다. 테이블이 의미하는 바를 어느 정도 이해하실 거라고 생각됩니다.
-
Default 실행시, WinAppDriver의 접근 URL은 http://127.0.0.1:4723 입니다.
-
Default 실행시, Appium의 접근 URL은 http://0.0.0.0:4723/wd/hub 입니다.
-
Test Runner PC가(Local Host IP Address: 127.0.0.1, NIC#1 IP Address: 14.45.108.221, NIC#2 IP Address 192.168.0.1) 있습니다.
- WinAppDriver Default 실행시, 접근 URL은 http://127.0.0.1:4723 입니다.
- Appium Default 실행시, 접근 URL은 (Local Host)http://127.0.0.1:4723/wd/hub, (NIC#1)*http://14.45.108.221:4723**/wd/hub**, (NIC#2)**http://192.168.0.1:4723**/wd/hub***** 입니다.
- Test Node PC#1이(NIC#1 IP Address: 192.168.0.2) 있습니다.
- WinAppDriver Default 실행시, 접근 URL은 http://127.0.0.1:4723 입니다.
- Appium Default 실행시, 접근 URL은 (Local Host)http://127.0.0.1:4723/wd/hub, (NIC#1)***http://192.168.0.2:4723**/wd/hub***** 입니다.
-
Test Runner PC(NIC#2 IP Address: 192.168.0.1) 및 Test Node#1(NIC#1 IP Address: 192.168.0.2)는 Private Network상에 존재합니다.
- Test Code에서 Test Runner PC(Local PC) / Test Node PC#1로(Remote PC) HTTP Message를 보낼 때 Valid한 URL이 아래의 테이블입니다. Test Node PC#1에 WinAppDriver를 뛰우고 Test Runner PC에서 실행되는 Test Code가 접근 불가능한 이유가 이해 되시지요. 아래 테이블을 이용해 Base 코드 수정를 수정할 예정입니다.
Python Test Code 실행@Test Runner PC(Local PC)
앞서 Test Runner PC(Local PC)에서 Appium을 실행해 둔 상태입니다. 이제 코드를 {Python Test Code→Appium→WinAppDriver(WAD)→Calculator@Local PC} 상황에 맞게 setUpClass()함수를 수정해야 합니다.
{수정 전: Calculatortest.py}
아래 WAD사이트의 Base 코드로 부터 수정을 해 나가겠습니다. Python으로 실행해 보면 요청된 리소스를 찾을 수 없다고 합니다. 위 테이블을 기억하시면 잘못된 URL로 Appium 접근 시도가 원인임을 알 수 있습니다.
- selenium.common.exceptions.WebDriverException: Message: The requested resource could not be found, or a request was received using an HTTP method that is not supported by the mapped resource
    def setUpClass(self):
        #set up appium
        desired_caps = {}
        desired_caps["app"] = "Microsoft.WindowsCalculator_8wekyb3d8bbwe!App"
        self.driver = webdriver.Remote(
            command_executor='http://127.0.0.1:4723',
            desired_capabilities= desired_caps)
{1st 수정 후: Calculatortest_1st.py}
위 테이블 설명에 따르면 3가지 가운데 하나로 Appium 접근 URL을 수정합니다. 다시 Test Code를 Python으로 실행해 보면 아래와 같이 platformName capability를 포함해야 한다고 합니다. 추가해 봅시다.
- selenium.common.exceptions.WebDriverException: Message: An unknown server-side error occurred while processing the command. Original error: You must include a platformName capability
    def setUpClass(self):
        #set up appium
        desired_caps = {}
        desired_caps["app"] = "Microsoft.WindowsCalculator_8wekyb3d8bbwe!App"

        #Appium Default URL로 수정합니다.
        #command_executor를 아래 2가지 중 하나로 수정하시기 바랍니다.
        # - http://127.0.0.1:4723/wd/hub
        # - http://192.168.0.1:4723/wd/hub
        # - http://14.56.108.221:4723/wd/hub
        self.driver = webdriver.Remote(
            command_executor='http://127.0.0.1:4723/wd/hub',
            #command_executor='http://192.168.0.1:4723/wd/hub',
            #command_executor='http://14.56.108.221:4723/wd/hub',
            desired_capabilities= desired_caps)
{2nd 수정 후: Calculatortest_2nd.py}
추가 전에 Appium Desired Capabilities는 Key와 Value로 구성된 JSON Object에 대해 알아야 합니다. 이전 환경 구축 게시물에서 Appium Server는 Test Code가 보내는 HTTP Message에 포함된 Platform(OS) 정보를 기반으로 Native Application UI상에서 수행할 동작을 컨트롤하기 위해 Platform-dependant한 Driver를(WinAppDriver) 이용한다고 했습니다. 즉, Test Code에서 사용할 환경을 Appium Server→Platform-dependant한 Driver에게 알려주는 역할을 하는겁니다.
Windows Applicaton을 테스트하기 때문에 테스트할 Application ID를 app에 지정하고 platformName으로 windows를 추가하고 실행해 보면, 이번에는 계산기가 실행되고 뭔가 조금 진행되다가 아래와 같이 element을 찾을 수 없다는 메시지가 잔뜩 뿌려집니다. 하~ 이건 또 뭘까요? 우리의 Test Code는 각 PC 상에서 있는 계산기를 찾아 실행했으나, 실행된 계산기 Application UI 요소인 숫자/연산자 버튼을 찾아 클릭해야 하는데, 이걸 찾지 못하고 있는 겁니다.
- selenium.common.exceptions.NoSuchElementException: Message: An element could not be located on the page using the given search parameters.
    def setUpClass(self):
        #set up appium
        desired_caps = {}
        desired_caps["app"] = "Microsoft.WindowsCalculator_8wekyb3d8bbwe!App"

        #Appium Desired Capabilities 추가
        # - platformName으로 windows 추가
        desired_caps["platformName"] = "windows"

        #Appium Default URL로 수정합니다.
        #command_executor를 아래 2가지 중 하나로 수정하시기 바랍니다.
        # - http://127.0.0.1:4723/wd/hub
        # - http://192.168.0.1:4723/wd/hub
        # - http://14.56.108.221:4723/wd/hub
        self.driver = webdriver.Remote(
            command_executor='http://127.0.0.1:4723/wd/hub',
            #command_executor='http://192.168.0.1:4723/wd/hub',
            #command_executor='http://14.56.108.221:4723/wd/hub',
            desired_capabilities= desired_caps)
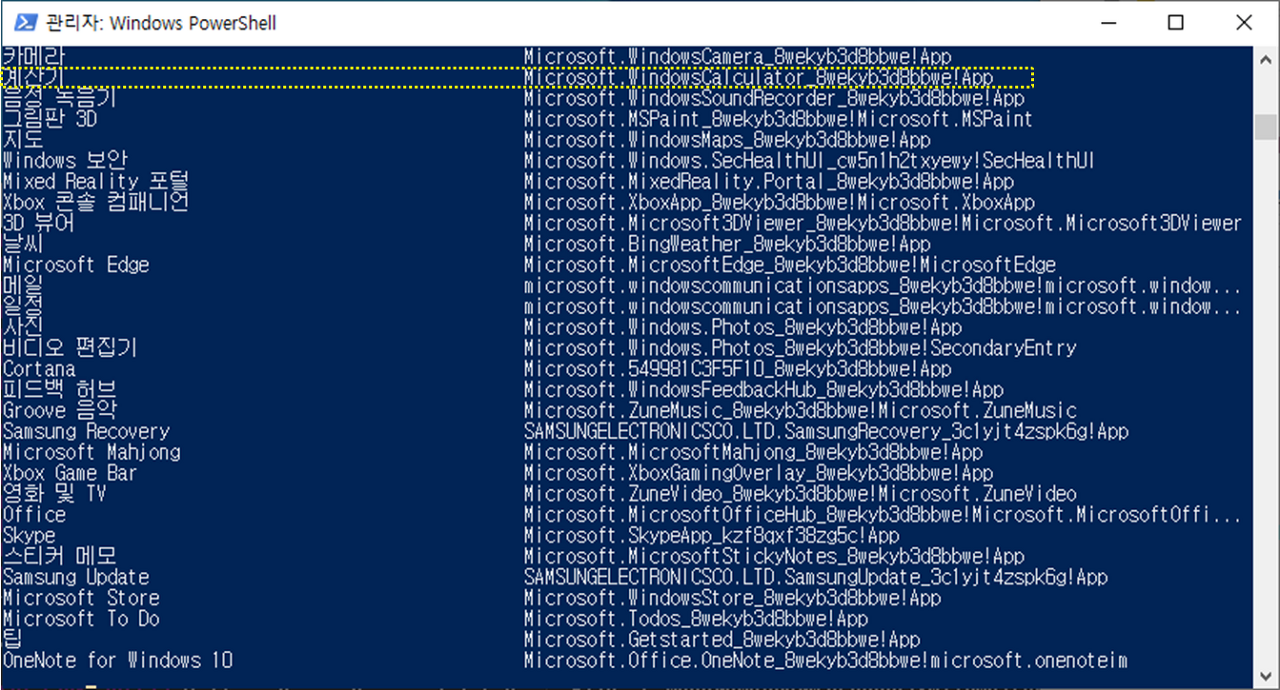
※ 참고로 설치된 Application ID는 PowerShell 창을 띄우고, Get-StartApps Command를 통해 확인할 수 있다.
{3rd 수정 후: Calculatortest_3rd.py}
계산기 Application UI 요소인 숫자/연산자 버튼을 찾아 클릭하는 Code를 한번 살펴 봅시다. Code를 보며 Finding element using name, Sending click action to an element 그리고 Retrieving element value의 3가지 동작을 하도록 되어 있습니다. 뭐가 문제일까요? element를 찾지 못한다고 했으니 함수 인자로 주어진 “Seven”, “Multiply by” 등이 의심 스럽습니다. WAD 사이트에서 받아 우리가 사용하고 있는 Base 코드는 영문판 Windows OS가 깔린 PC에서 수행된 계산기 Application을 기반으로 만들어져서 그런 겁니다.
    def test_combination(self):
        self.driver.find_element_by_name("Seven").click()
        self.driver.find_element_by_name("Multiply by").click()
        self.driver.find_element_by_name("Nine").click()
        self.driver.find_element_by_name("Plus").click()
        self.driver.find_element_by_name("One").click()
        self.driver.find_element_by_name("Equals").click()
        self.driver.find_element_by_name("Divide by").click()
        self.driver.find_element_by_name("Eight").click()
        self.driver.find_element_by_name("Equals").click()
        self.assertEqual(self.getresults(),"8")
그럼 한글판 Windows OS상에서 구동되는 계산기의 숫자/연산자 버튼의 Name은 뭘까요? “일”, “더하기” 등일 까요? 숫자/연산자 버튼과 같은 Application UI 요소 정보를 확인용 Tool을 포함하는 Windows 10 SDK를 별 다른 설정없이 쭉 넘겨 설치합니다. 설치 후, Windows 10 SDK 폴더(C:\Program Files (x86)\Windows Kits\10\bin\10.0.20348.0\x64) 아래에 보면 2가지 Tool이(inspect.exe, UIAVerify 폴더 아래에 VisualUIAVerifyNative.exe)있습니다. 사용해 보시면 편하신 걸 이용하시면 됩니다. 개인적으로 내가 Click하고 있는 UI 요소를 Highlinghting해 주는 VisualUIAVerifyNative.exe를 선호 합니다.
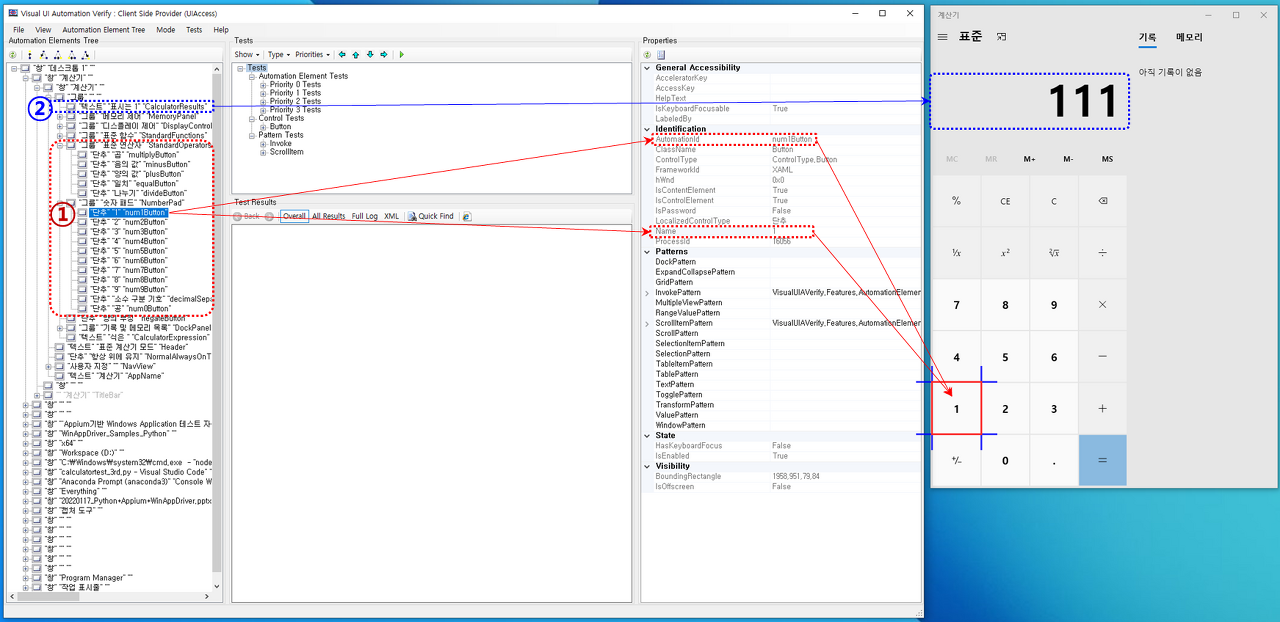
이제 VisualUIAVerifyNative.exe 실행하고 계산기를 실행해서 계산기 숫자/연산자 버튼을 눌러 Name을 찾아 Code를 수정하도록 합니다.
- VisualUIAVerifyNative.exe 왼쪽 트리 창에서 “그룹” “숫자패드” “NumberPad”에서 “단추” “1” “num1Button”가 숫자 1버튼입니다. (①로 마크한 부분) 여기서 “1”이 Name이고, *“num1Button”은 Name 대신 숫자 1버튼을 접근할 수있는 AutomationId입니다.*
- ②로 마크한 부분은 결과를 보여 주는 곳인데, Name이 “표시는 111”이 아니라 “표시는 “입니다.
드디어 한글판 Windows OS PC상에서 있는 계산기를 실행하고, 실행된 계산기 Application UI 요소인 숫자/연산자 버튼을 클릭하고, 최종 연산의 결과가 출력되는 Application UI 요소인 결과창의 값을 읽어 기대값과 비교하여 Pass/Fail을 판단하는 Test Code가 완성되었습니다.
import unittest
from appium import webdriver

class SimpleCalculatorTests(unittest.TestCase):

    @classmethod

    def setUpClass(self):
        #set up appium
        desired_caps = {}
        desired_caps["app"] = "Microsoft.WindowsCalculator_8wekyb3d8bbwe!App"

        #Appium Desired Capabilities 추가
        # - platformName으로 windows 추가
        desired_caps["platformName"] = "windows"

        #Appium Default URL로 수정합니다.
        #command_executor를 아래 2가지 중 하나로 수정하시기 바랍니다.
        # - http://127.0.0.1:4723/wd/hub
        # - http://192.168.0.1:4723/wd/hub
        # - http://14.56.108.221:4723/wd/hub
        self.driver = webdriver.Remote(
            command_executor='http://127.0.0.1:4723/wd/hub',
            #command_executor='http://192.168.0.1:4723/wd/hub',
            #command_executor='http://14.56.108.221:4723/wd/hub',
            desired_capabilities= desired_caps)

    @classmethod
    def tearDownClass(self):
        self.driver.quit()

    def getresults(self):
        displaytext = self.driver.find_element_by_accessibility_id("CalculatorResults").text
        displaytext = displaytext.strip("표시는 " )
        displaytext = displaytext.rstrip(' ')
        displaytext = displaytext.lstrip(' ')
        return displaytext


    def test_initialize(self):
        self.driver.find_element_by_name("지우기").click()
        self.driver.find_element_by_name("7").click()
        self.assertEqual(self.getresults(),"7")
        self.driver.find_element_by_name("지우기").click()

    def test_addition(self):
        self.driver.find_element_by_name("1").click()
        self.driver.find_element_by_name("양의 값").click()
        self.driver.find_element_by_name("7").click()
        self.driver.find_element_by_name("일치").click()
        self.assertEqual(self.getresults(),"8")

    def test_combination(self):
        self.driver.find_element_by_name("7").click()
        self.driver.find_element_by_name("곱").click()
        self.driver.find_element_by_name("9").click()
        self.driver.find_element_by_name("양의 값").click()
        self.driver.find_element_by_name("1").click()
        self.driver.find_element_by_name("일치").click()
        self.driver.find_element_by_name("나누기").click()
        self.driver.find_element_by_name("8").click()
        self.driver.find_element_by_name("일치").click()
        self.assertEqual(self.getresults(),"8")

    def test_division(self):
        self.driver.find_element_by_name("8").click()
        self.driver.find_element_by_name("8").click()
        self.driver.find_element_by_name("나누기").click()
        self.driver.find_element_by_name("1").click()
        self.driver.find_element_by_name("1").click()
        self.driver.find_element_by_name("일치").click()
        self.assertEqual(self.getresults(),"8")

    def test_multiplication(self):
        self.driver.find_element_by_name("9").click()
        self.driver.find_element_by_name("곱").click()
        self.driver.find_element_by_name("9").click()
        self.driver.find_element_by_name("일치").click()
        self.assertEqual(self.getresults(),"81")

    def test_subtraction(self):
        self.driver.find_element_by_name("9").click()
        self.driver.find_element_by_name("음의 값").click()
        self.driver.find_element_by_name("1").click()
        self.driver.find_element_by_name("일치").click()
        self.assertEqual(self.getresults(),"8")

if __name__ == '__main__':
    suite = unittest.TestLoader().loadTestsFromTestCase(SimpleCalculatorTests)
    unittest.TextTestRunner(verbosity=2).run(suite)
3. 테스트 자동화 Case#2: Python Test Code→{Appium→WinAppDriver(WAD)→Calculator@Remote PC}
다음은 Test Node PC상에서 Appium을 실행시키고, Test Runner PC상의 Python Test Code를 이용해 Test Node PC상의 계산기 Appication 테스트를 진행해 보겠습니다. 즉, 계산기 테스트 자동화 Flow에서 두번째 줄에 해당됩니다.
Appium 실행@Test Node PC(Remote PC)
Test Node PC(Remote PC)에서 Appium, WinAppDriver(WAD) 그리고 Calculator Application 모두가 실행되게 하기 위해서 먼저 Appium을 실행합니다.
윈도우 시작-Node.js에서 Node.js command prompt 클릭하여 Command Line 창을 띄워 Appium을 실행합니다.
appium
아무런 옵션을 주지 않았기 때문에 Default 설정으로(http://0.0.0.0:4723/wd/hub) Appium은 실행됩니다.
Python Test Code 실행@Test Runner PC(Local PC)
Test Node PC(Remote PC)에서 Appium을 실행해 둔 상태입니다. 이제 코드를 Python Test Code→{Appium→WinAppDriver(WAD)→Calculator@Remote PC} 상황에 맞게 setUpClass()함수를 수정합니다.
{4th 수정 후: Calculatortest_4th.py}
위에서 설명 드렸던 테이블 기억 나시나요? Calculatortest_3rd.py 파일에서 아래와 같이 Test Node PC#1에서 실행되는 Appium 접근 URL로 수정하시면 됩니다. Test Runner PC에서 Python으로 실행하면 Test Node PC에 있는 계산기가 실행되고, 실행된 계산기 Application UI 요소인 숫자/연산자 버튼을 클릭하고, 최종 연산의 결과가 출력되는 Application UI 요소인 결과창의 값을 읽어 기대값과 비교하여 Pass/Fail을 판단하는 테스트가 진행될 것입니다.
    def setUpClass(self):
        #set up appium
        desired_caps = {}
        desired_caps["app"] = "Microsoft.WindowsCalculator_8wekyb3d8bbwe!App"

        #Appium Desired Capabilities 추가
        # - platformName으로 windows 추가
        desired_caps["platformName"] = "windows"

        #Appium Default URL로 수정합니다.
        #command_executor를 Appium이 실행되고 있는 Test Node PC IP Address로 수정하시기 바랍니다.
        self.driver = webdriver.Remote(
            command_executor='http://192.168.0.2:4723/wd/hub',
            desired_capabilities= desired_caps)
기본적인 Windows Application 테스트 자동화 Test Code를 확보하신 걸 축하드립니다. 이 Code를 기반으로 다른 Application으로 확대하거나, JSON 파일에서 Appium 주소를 읽어 여러 대의 Test Node PC에 동일 혹은 다른 Test가 실행되도록 기능 확장해 보시기 바랍니다.
여기가 끝입니다. 정독하신 분들께 많은 도움이 되셨길 바랍니다.